

A tour of Thinkverse
Start here if you've never opened Thinkverse before. The walkthrough covers the three surfaces you'll spend your time in:
- Classrooms — your students, grouped the way you teach them.
- Sessions — the practice you assign, in class or as homework.
- Analytics — what students did, where they got stuck, and who needs you next.
Everything else in this help center hangs off those three ideas.
Thinkverse currently supports mathematics, with other subjects planned.
It is not a math curriculum. The AI tutor and teaching assistant provide content aligned with — and supplemental to — the core curriculum your school already uses. You keep teaching your scope and sequence; Thinkverse gives students guided practice against it and gives you the data back.
The tutor is built to guide students step-by-step without revealing answers. Prompts probe reasoning rather than fishing for a final number, which is why students can use it independently without it becoming an answer key.
See How it works for the fuller picture.
Create a classroom and add your students
A classroom is the group you assign practice to. Most teachers create one per section or period.
Create the classroom
- Click Create classroom — on the Classrooms page, on the dashboard's Classrooms card, or from the classroom switcher.
- Under Basic Information, give it a name and pick the school year. The year sets the classroom's start and end dates automatically (July 1 to June 30); you can adjust both later in the classroom's Settings.
- Under Add Students, choose how students will get in (next section).
- Click Create Classroom.
If your school rosters through ClassLink, your classes import themselves the first time you sign in with the ClassLink button — check your classroom list before building anything by hand. (Clever schools: Clever handles sign-in only, so you still create classrooms one of the ways below.)
Four ways to add students
Invite by class code (the default). Every classroom gets a permanent code in
the format ABCD-1234. Students join by typing it into Join classroom on
their dashboard, on the login page, or through the signup link you can copy from
Students → Add students. You'll find the code itself there too, and in the
classroom's Settings. The code doesn't expire.
Import by email. Paste student emails — one per line, or separated by commas. Each becomes a roster spot immediately; the student claims it the first time they sign in with that same email. No invitation email is sent, so you still need to tell students to sign in. Until they do, they'll show on your roster as Anonymous.
Google Classroom. Pick one of your Google courses and the roster syncs from it. One Thinkverse classroom per Google course.
ClassLink. For ClassLink districts — this option only appears if your school's connection is set up, and most ClassLink teachers never need it, because classes import automatically at first sign-in.
How students sign in
Students use their email and password (they set the password themselves — minimum six characters) or a Google, Clever, or ClassLink button, depending on what your school uses. There are no usernames.
A brand-new student can only sign up with a class code or after you've added their email — otherwise Thinkverse rejects the signup, which is what keeps random accounts out of your roster.
Removing a student
Students tab → the row's ⋯ menu → Remove (or select several and remove them together). This only takes them off the roster — their account and work history aren't deleted. Note that a removed student can rejoin with the class code, so if you're removing someone permanently, it's worth knowing the code stays live.
Co-teachers are managed per classroom, in that classroom's own Settings tab — not in the Settings item on the left sidebar (that one holds your personal profile).
A co-teacher can see and manage the classroom just like you — students, sessions, and analytics. What they can't do: delete or rename the classroom, change its dates, or manage other co-teachers.
Add a co-teacher
- Open the classroom, then its Settings tab.
- Find the Co-teachers section and click + Add co-teacher.
- Enter the co-teacher's email address in the prompt. Use the email on their Thinkverse account — the connection links up when they sign in with exactly that address, and there's no warning if it doesn't match.
- The new entry appears with an Unsaved change chip. Click Save changes at the bottom of the page.
If adding fails with "Cannot add Lite user(s) as co-teacher", the email isn't attached to a school organization — this usually means a personal address (gmail.com and similar) was used instead of the school one.
Co-teachers aren't notified automatically, so tell them the classroom is waiting.
Remove a co-teacher
- Open the classroom's Settings tab.
- In the Co-teachers list, hover over the person's row — a Remove button appears on the right.
- Click it, then Save changes.
Removing a co-teacher only disconnects them from this classroom; their account and their other classrooms are untouched.
Neither change takes effect until you click Save changes.
A session is a block of practice: you choose the skills, set the pacing, and assign it to a classroom. Students see it when they sign in.
Sessions work for in-class practice and for homework — students can reach an assigned session from any supported device, so the same session covers both.
The walkthrough below builds one session end to end.
Step 1 — Start a new session
Create new session sits at the top of the left sidebar, above the navigation. It is available from anywhere in the app, so you do not need to be on the dashboard first.
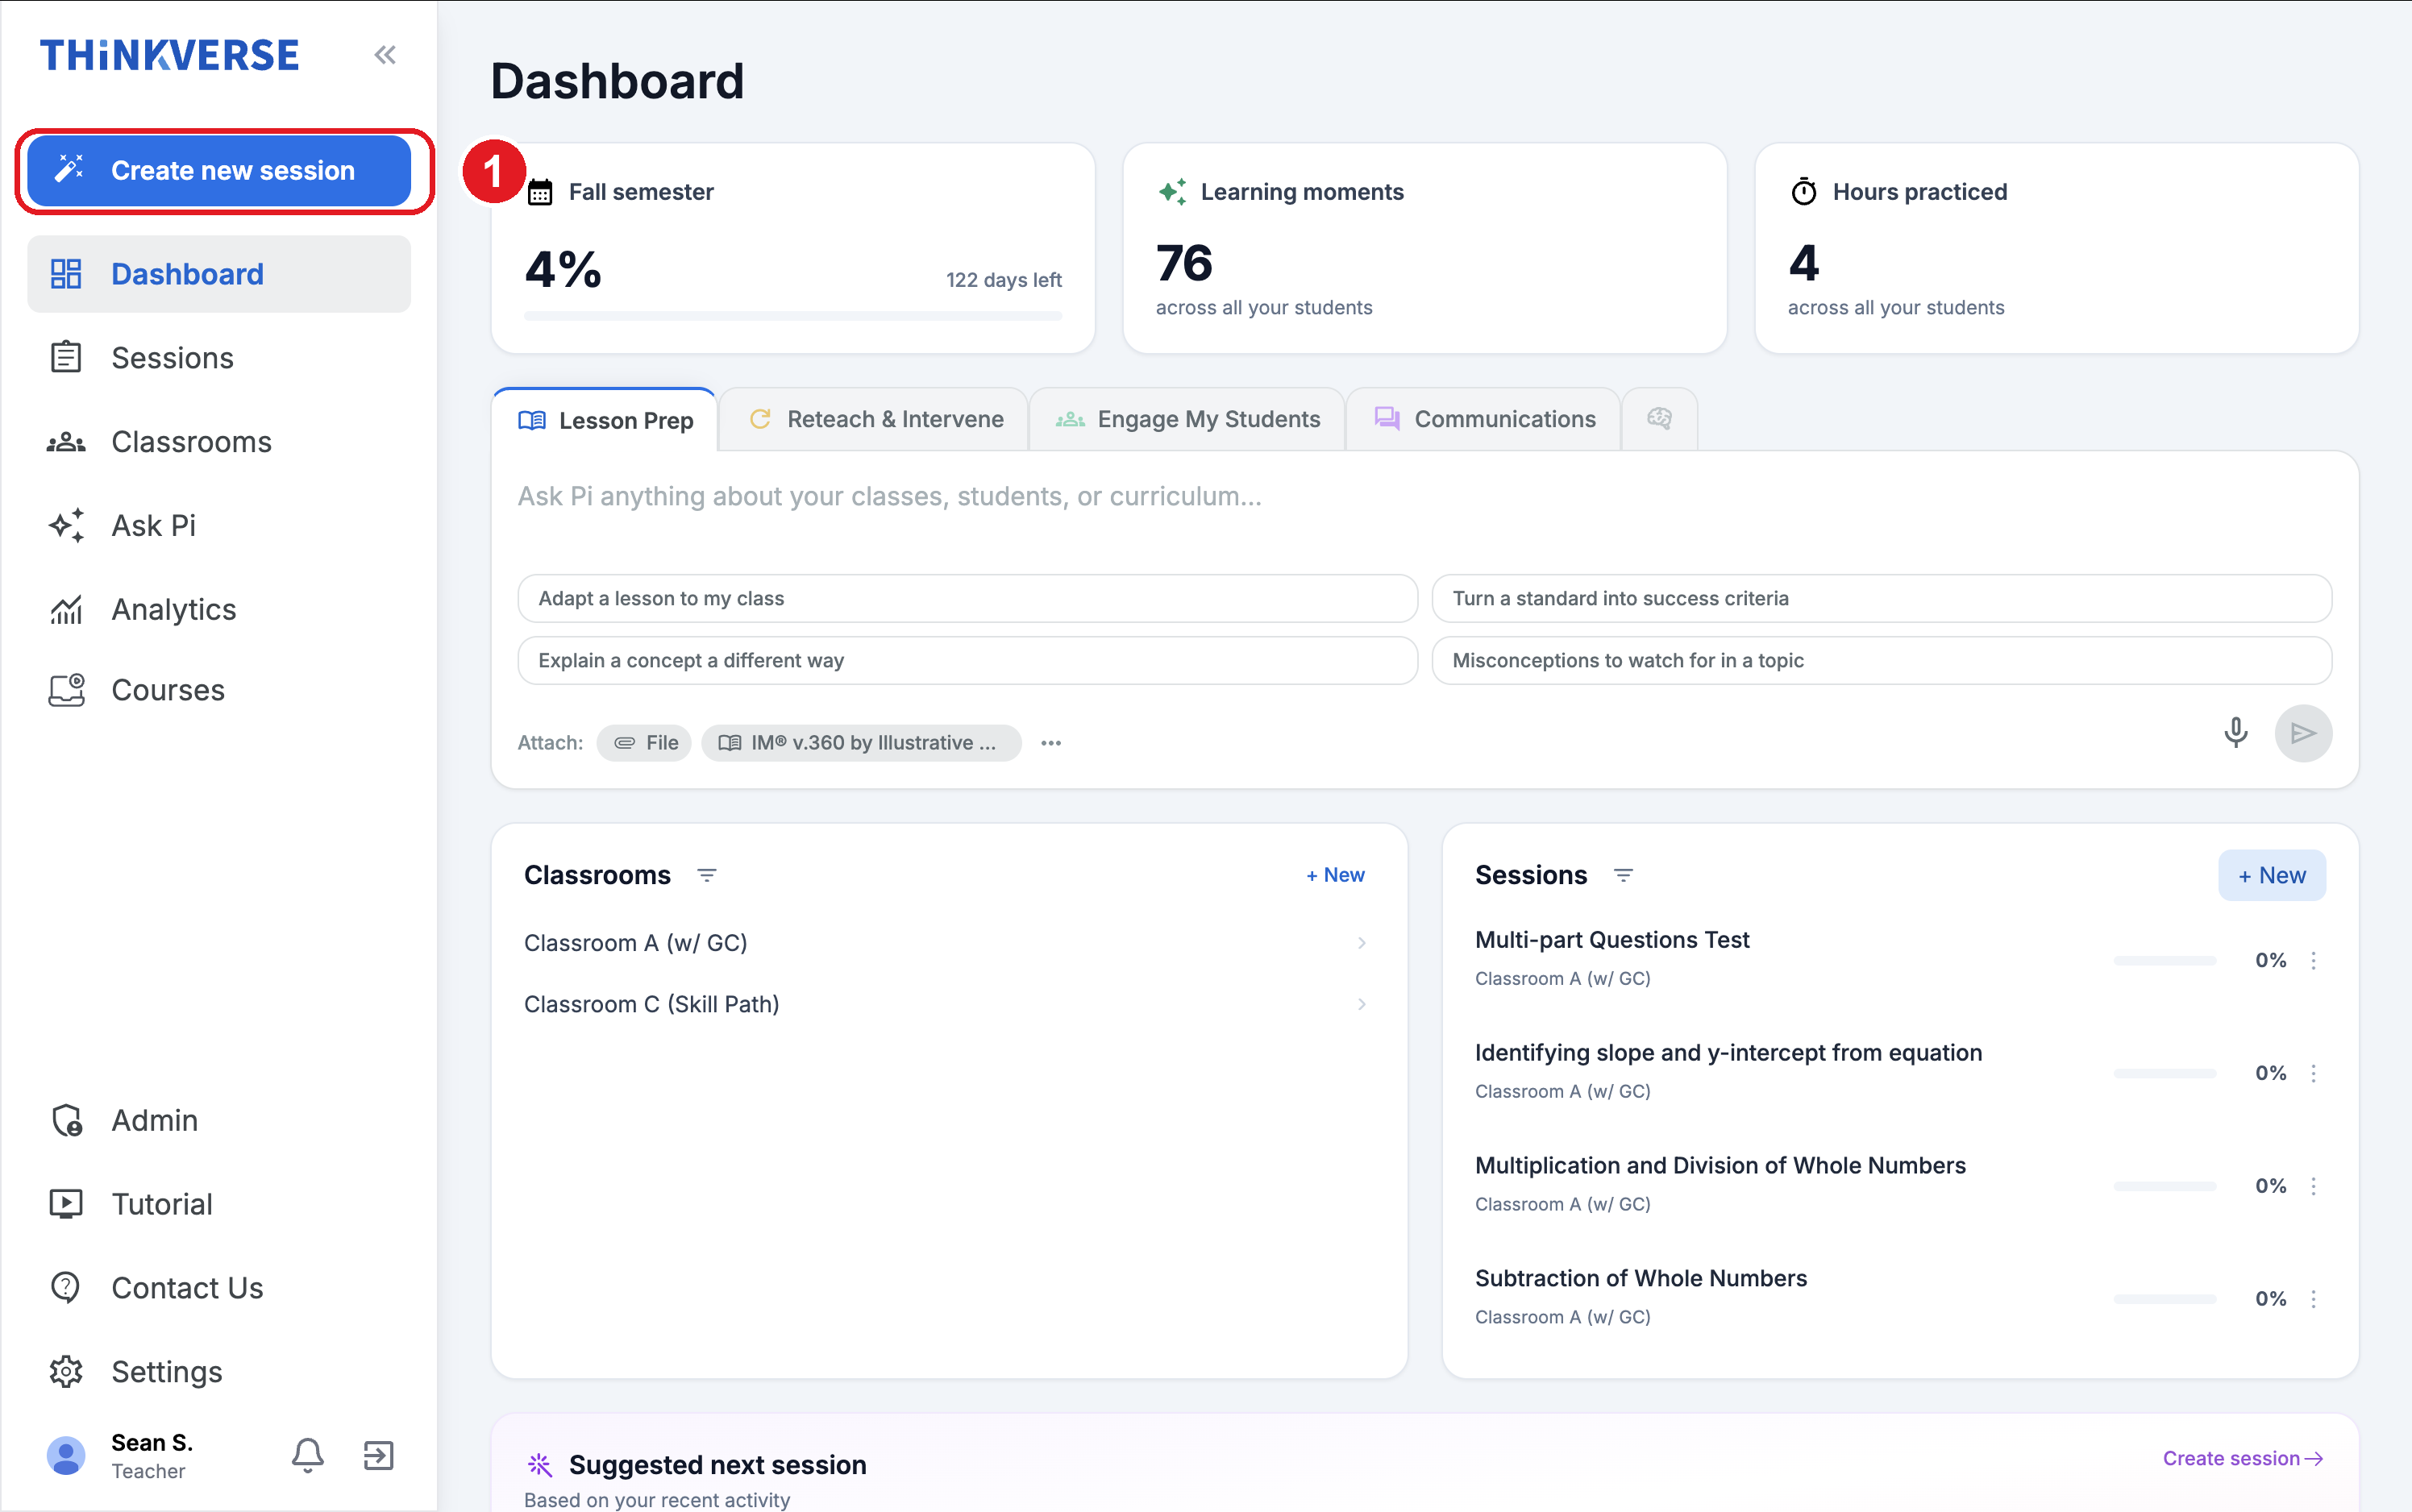
The Sessions panel further down the dashboard has a + New button that does the same thing.
Step 2 — Open the skill picker
A new session opens empty, with two halves to fill in:
- Select skills — the content students will practice.
- The settings panel on the right — the name, the classroom, and the session options.
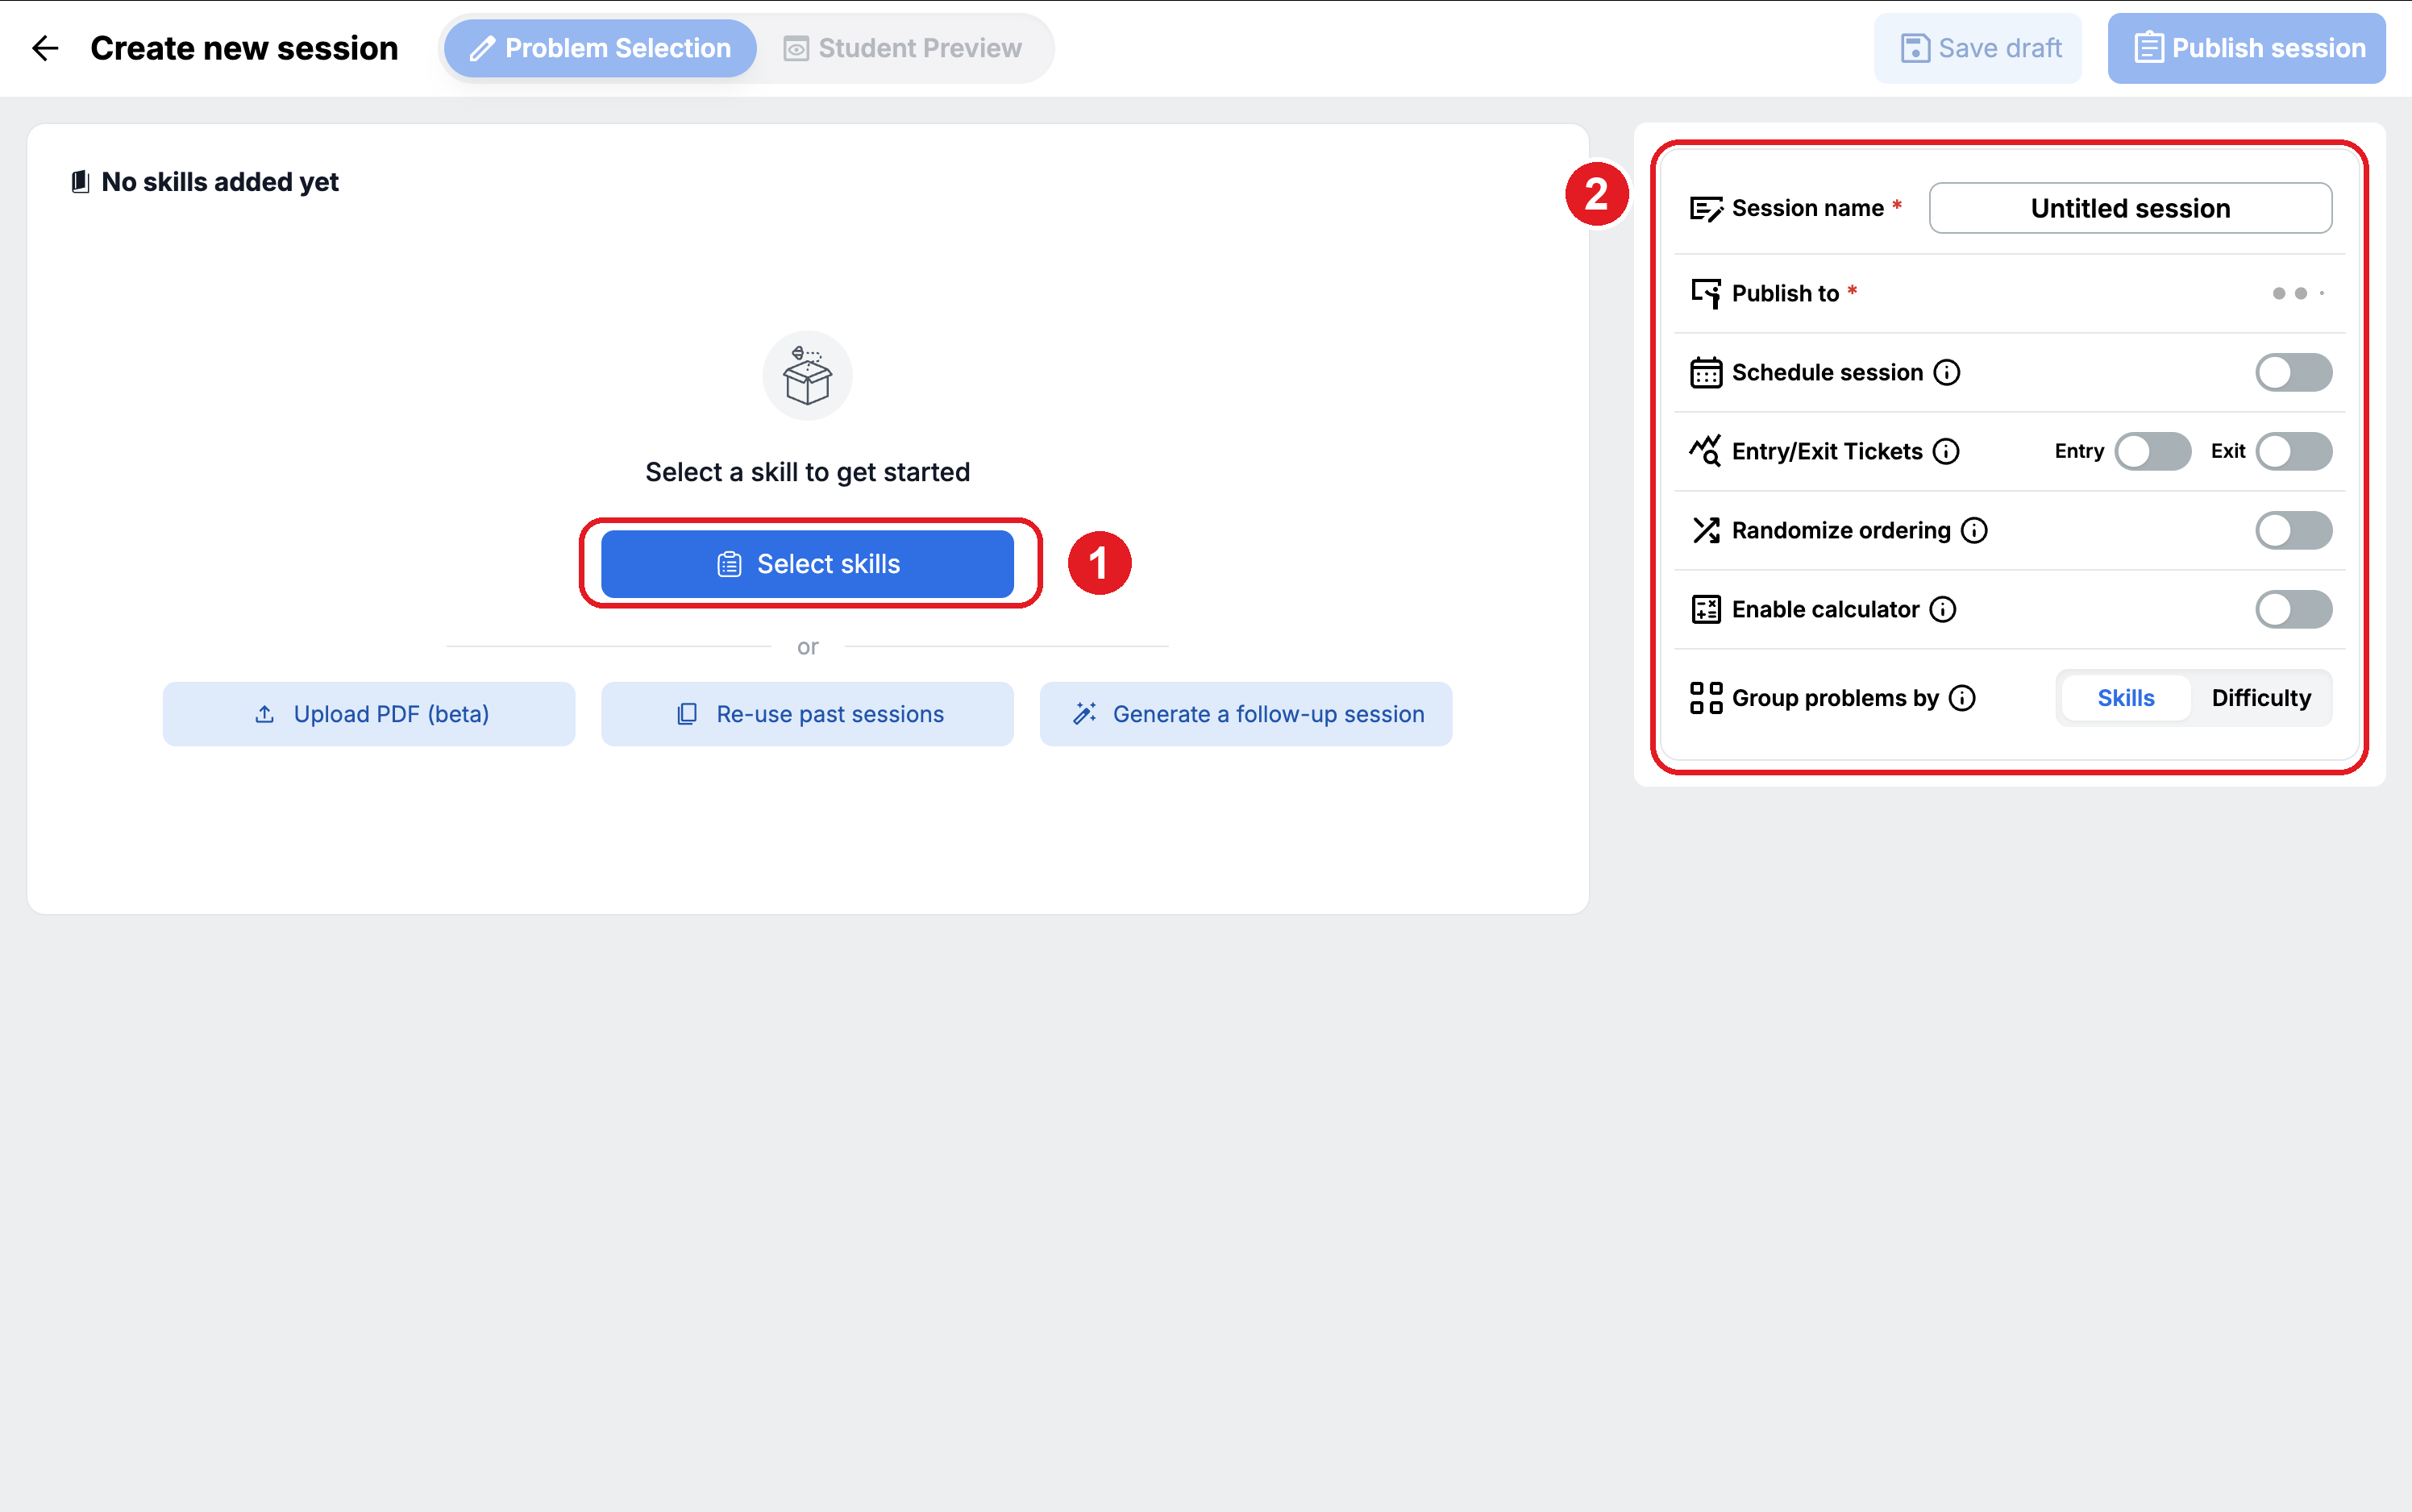
Start with Select skills. Three of the settings are worth knowing before you go further:
- Entry/Exit Tickets — turn Exit on and each skill with at least three practice problems gets one exit-ticket problem (likewise Entry). Turn both on to measure each student's growth before vs. after practice.
- Group problems by — Skills keeps each skill's problems together; Difficulty orders Easy → Medium → Hard across all skills.
- Group students (beta) — appears once you've picked a classroom; it lets you give different skills to different groups. Covered separately in assigning different work to different students.
If you already have material, the three buttons under or start from that instead: Upload PDF (beta), Re-use past sessions, and Generate a follow-up session.
Step 3 — Choose the skills
The Add skills dialog offers up to four ways to find content — General, Curriculum, Standard, and Assessment (the Assessment tab appears only if your organization has assessment standards connected). Pick whichever matches how you plan your lessons; they reach the same skill library.
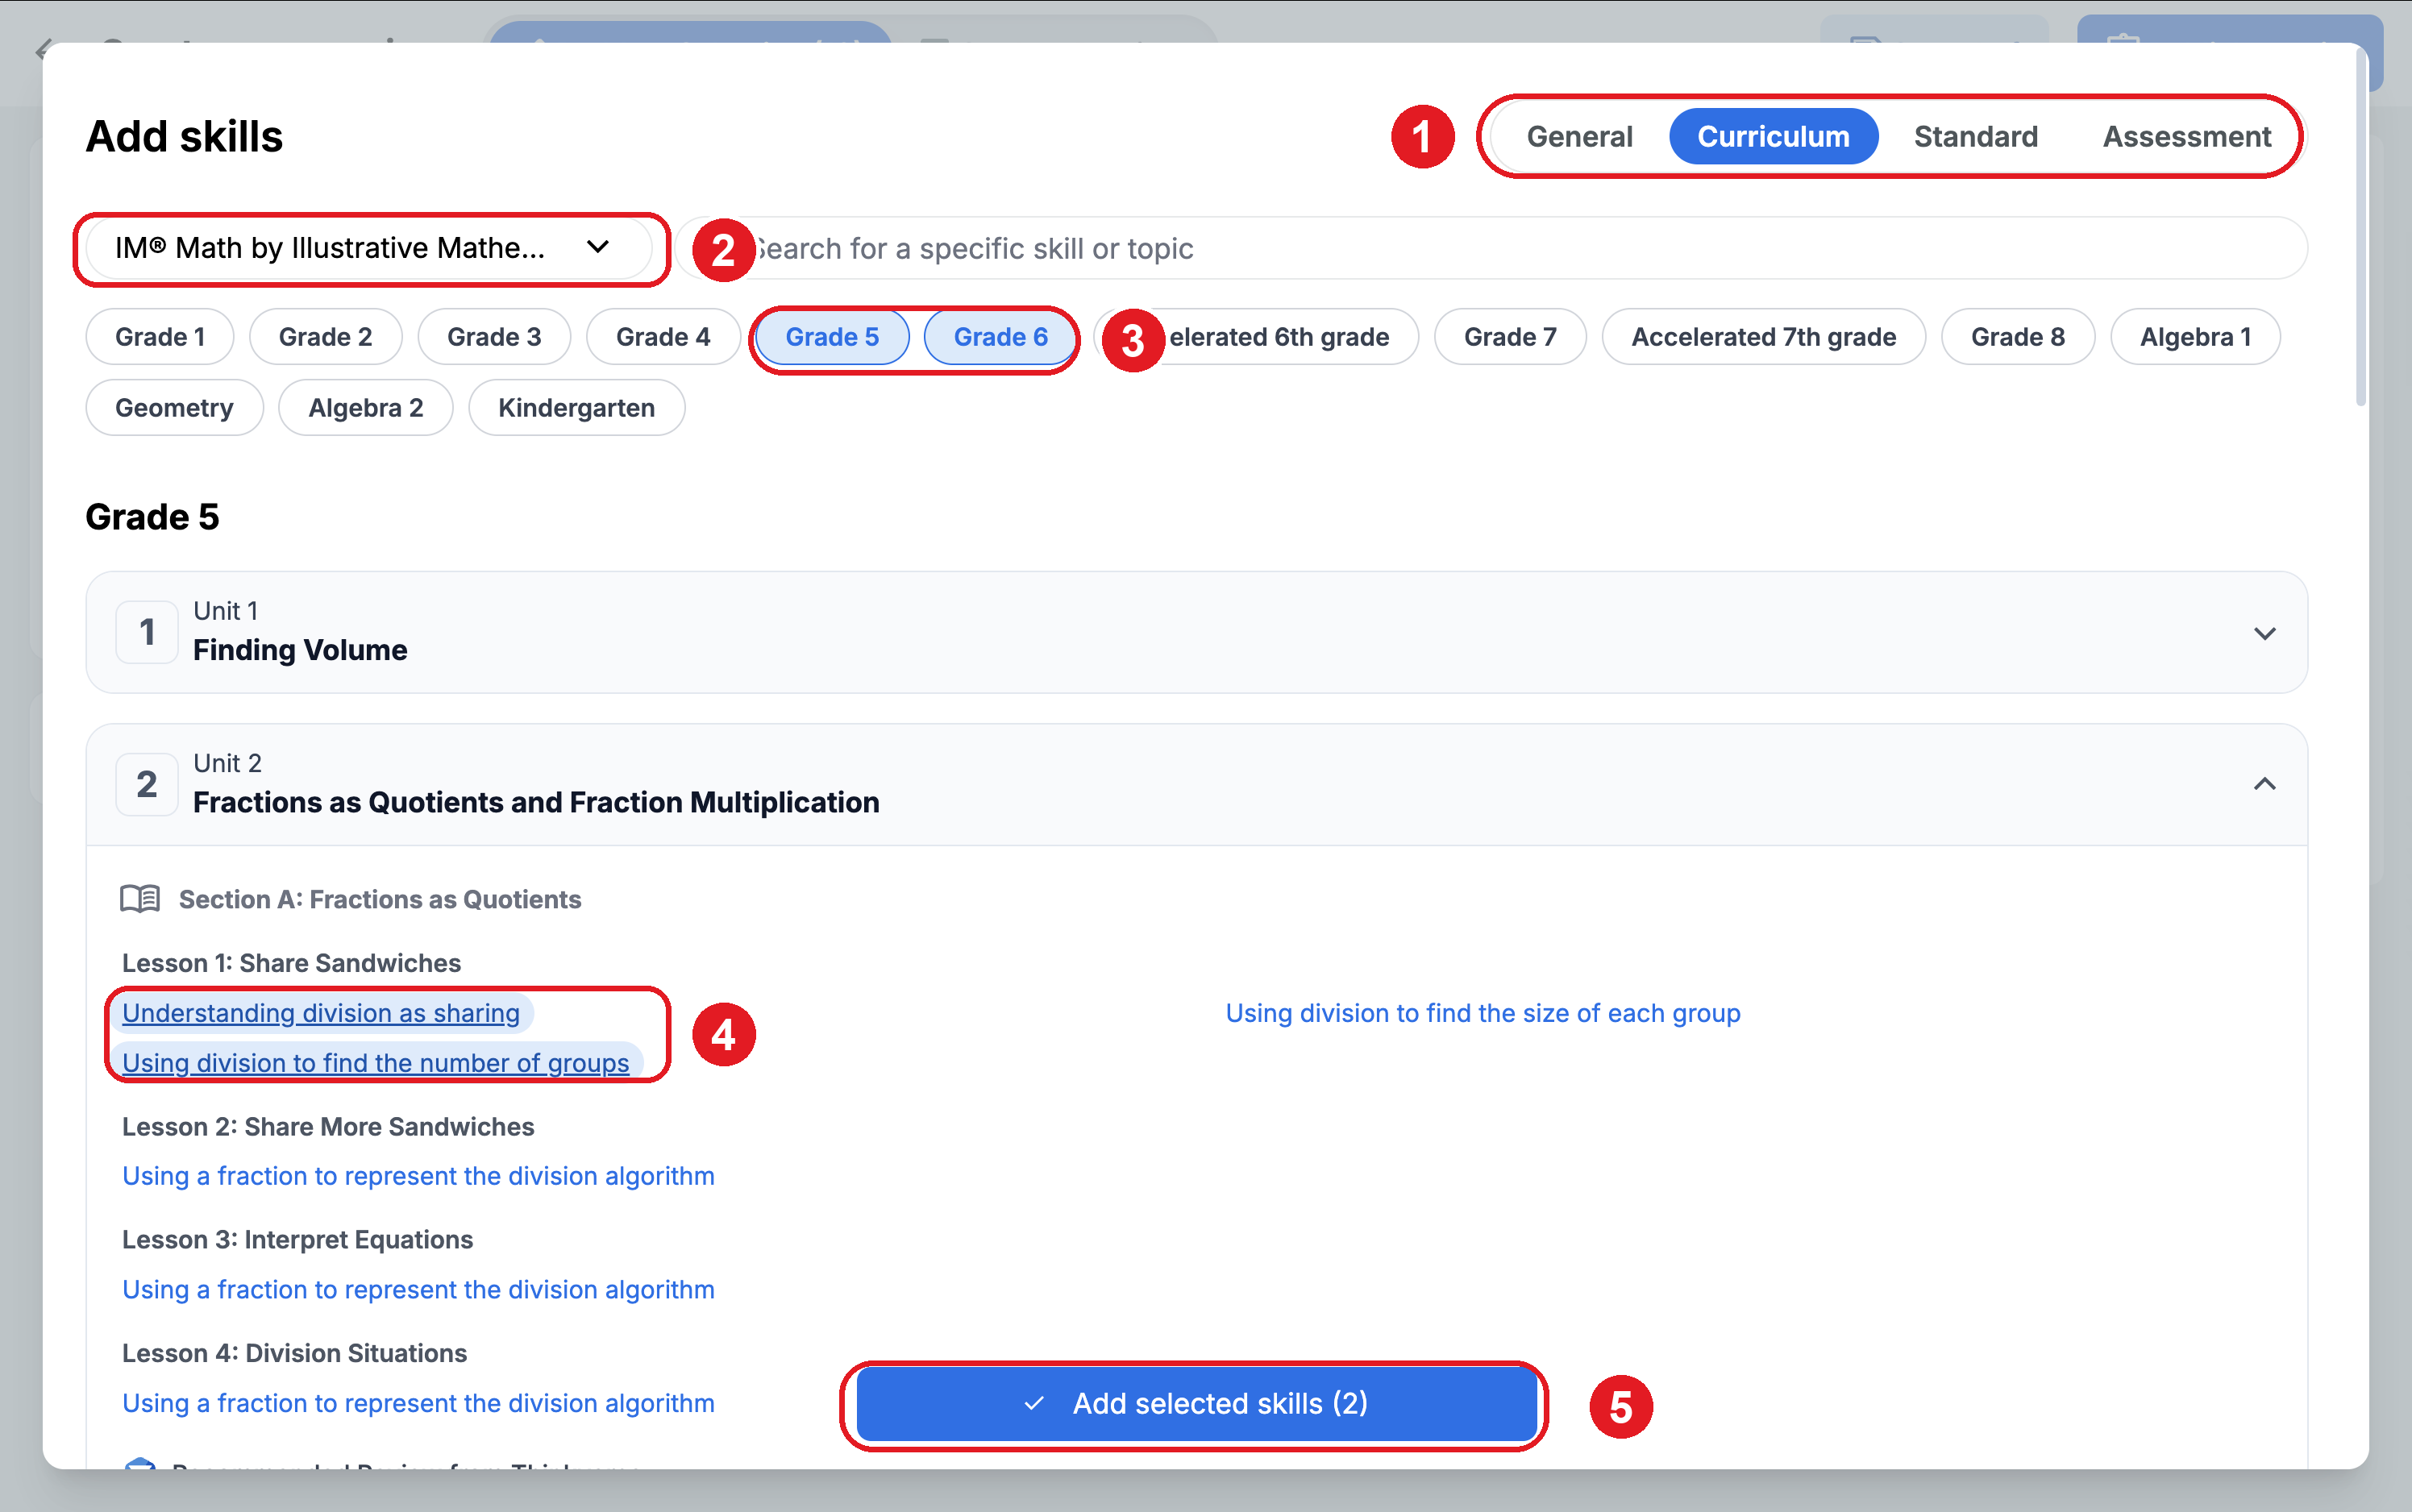
Working through it:
- Pick a source tab. The example uses Curriculum.
- Choose the curriculum. Here it is IM® Math by Illustrative Mathematics.
- Filter by grade. More than one grade can be active at once — Grade 5 and Grade 6 are both selected here.
- Click the skills you want. Selected skills turn into filled pills. Curriculum results are grouped by unit, section, and lesson, so a skill sits where it falls in the sequence.
- Confirm. The button counts your selections — Add selected skills (2).
The search box at the top jumps straight to a skill or topic if you already know what you are looking for.
Step 4 — Set the pacing, then publish
Back in Problem Selection, each skill gets its own row and the header counts the total problems in the session.
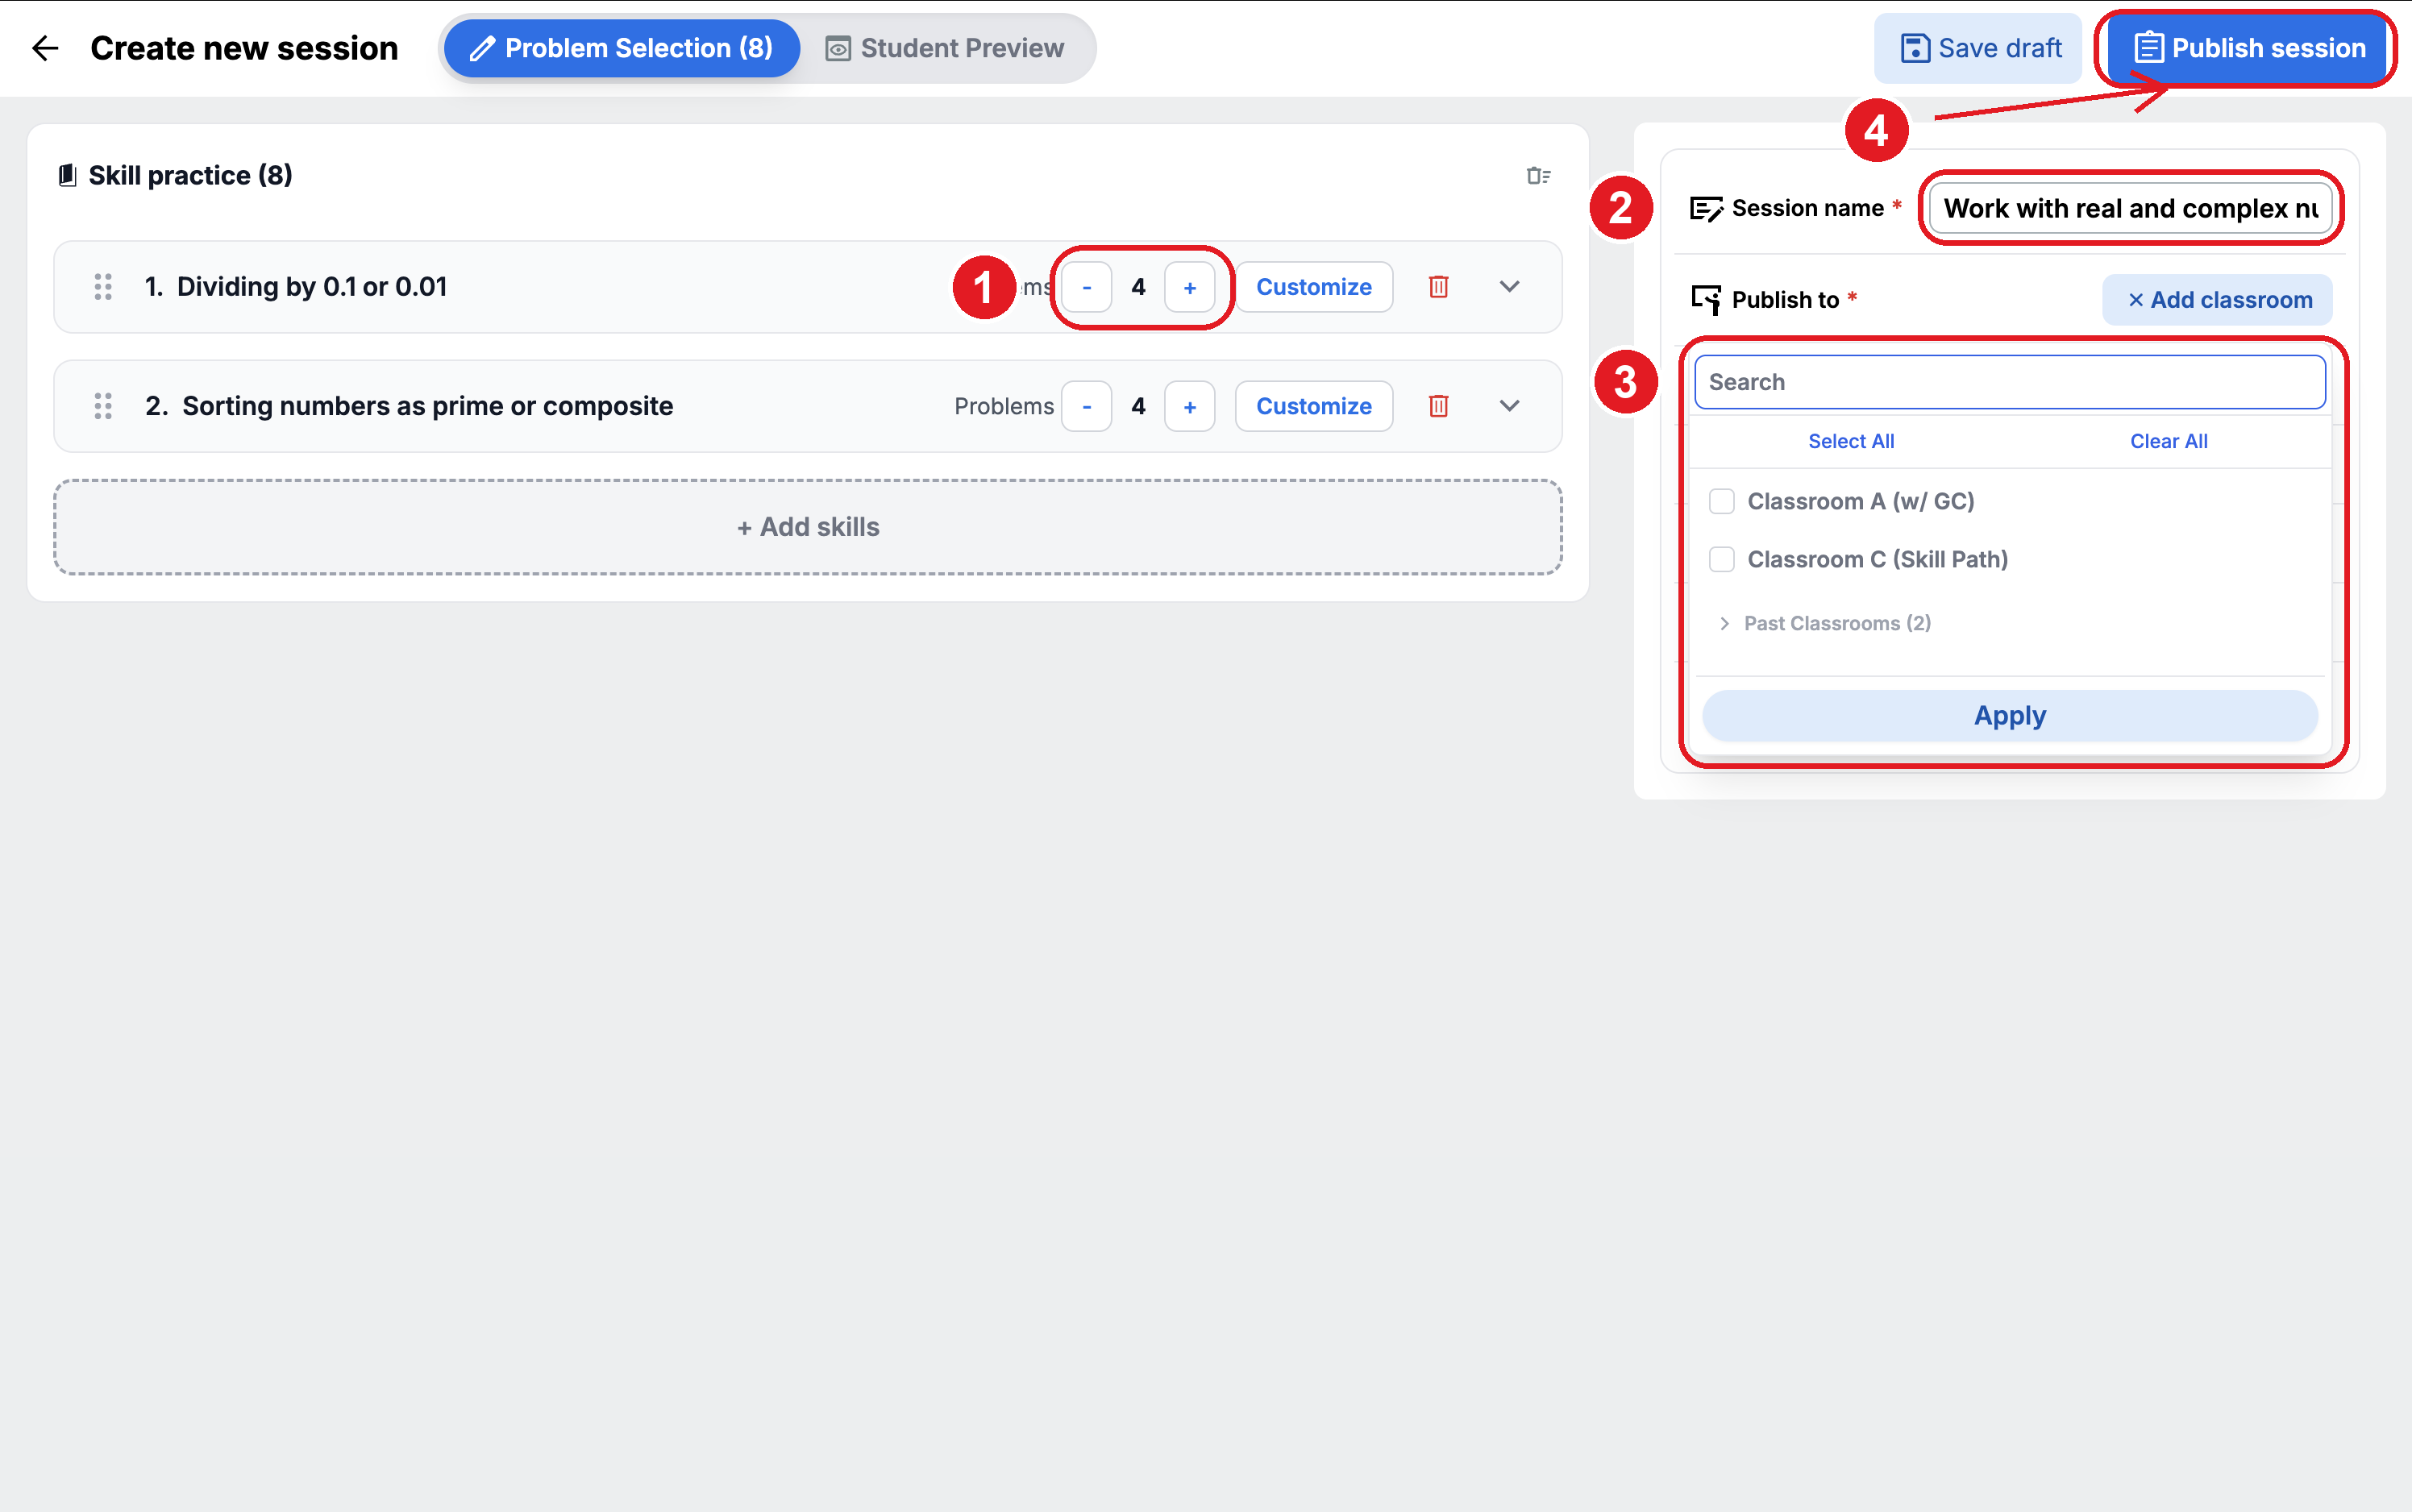
- Set problems per skill. Each skill defaults to 4; the − and + buttons change it. Customize opens that skill's problems, the trash icon removes the skill, and the handle at the left reorders it.
- Name the session. Thinkverse pre-fills a name from the skill or unit you picked; students see whatever ends up here, so make it something they will recognize.
- Choose the classroom. Publish to opens a checklist of your classrooms — tick one or more, then Apply. Publish to is required.
- Publish session.
The counts on this screen explain each other: two skills at four problems each gives Skill practice (8), and the header reads Problem Selection (8). Entry or exit tickets, if you turned them on, add their problems on top.
Save draft keeps everything without releasing it to students, which is the safer button if you are still deciding. Drafts live on the Sessions page under the Draft filter, and unlike published sessions, a draft's skills and problems stay fully editable.
One more setting worth a mention: Randomize ordering shuffles problem order per student within each skill (or difficulty group), and only for groups with five or more problems — the skill sequence itself stays put. It's the setting to reach for when screens are close together.
After you publish
The session appears in the Sessions list on your dashboard with a completion percentage that fills in as students work. To watch one while it runs, see monitoring a live session.
You don't have to do this alone. Thinkverse includes 1:1 onboarding and live customer support.
- Email support@thinkverse.co with a question.
- Or book time with the team using the link at the bottom of any help page and we'll walk your setup with you.
Still need a hand?
Email the support team and we’ll get back to you, or book time with us to walk through it together.